|
FINDING HEX EDITS
Bring back something cool for us
This guide assumes that you don't know any ASM, and will only go into as much of it as needed to help with your ability to recognize types of code and make targeted edits. The truth is I myself don't know much ASM at all, which might help me explain things a bit better to someone else who also does not know it. This knowledge can be used on just about any SNES game, not just Super Metroid (addresses might look a little different for other games because there are different types of ROM). Summary of the process Deciding what to edit Making a trace .log file Blind edits and testing Kejardon's RAM map Chasing data Data near data Using breakpoints Obvious edits Stuff to look for & references SUMMARY OF THE PROCESS
Finding hex tweaks can be a very long and involved process because you'll need to have multiple programs open at once and switch between them often, and because there's more than one way to do it. So to get you a bit more prepared, here's an extremely vague run-down of the general process from beginning to end. Don't follow these steps like a guide unless you just need a reminder: Tools needed: SMILE HxD Geiger's debugger Lunar Address Kejardon's RAM map 1. Decide what you want to try finding a tweak for. 2. Use Geiger to make a trace while what you wanna tweak is happening. 3. Search Geiger's .log file for relevant data; Kejardon's RAM map helps. 4. Convert a LoROM address to a PC address where there's promising data. 5. Make 'blind edits' with a hex editor, test results, undo blind edits. 6. If you find a cool new edit, test it for bugs and write it down. DECIDING WHAT TO EDIT
Figuring out what to try editing can be the hardest step, honestly. First of all, there's whether or not the value you wanna look for even exists. After that it's thinking of an edit that CAN be done with a small number of bytes, then finally it's making sure that somebody else hasn't already found it. I can't lie, without some kind of understanding about how the game works internally, most of your ideas for new hex edits will probably not be possible with just a few bytes. But don't be discouraged. Most likely, the first hex edit you find will be on accident and it won't be what you were even looking for. Unless you learn ASM, you won't have much control over what kind of edits you find. It's all good though. I've accidentally found hex edits that were a lot cooler than what I was looking for to begin with, so just roll with it. There's always the option of looking for nothing in particular, or better yet, looking in the 'general area' of something. For example, looking for whatever changes you can find that affect screw attack without having a specific edit for the screw attack in mind (looking near other known screw attack edits might help too). If you go with either of these options, you'll have to pay more attention while testing the game since you're not watching something specific for changes being made to it - instead, changes might happen somewhere else and it's up to you to notice them if they do happen (they can be very subtle and you'll miss them if you're not careful). Always keep an eye out for changes that you didn't expect, even if you're looking for something specific. You might just find something related to what you were looking for that's also useful. An example of this happening is while I was playing with the speed booster, I was looking for a way to make the blue color and sound happen instantly when Samus ran. Instead I found like 15 other speed booster edits, including one that basically did what I was trying to do from the beginning. Never expect that what you're looking for is the first thing you'll find, or that you'll even find it. Remember that all we're doing is making a bunch educated guesses - we can't be certain of anything unless, again, we actually know ASM, which is the programming that glues everything together. There's no guarantee I'll find anything since I'm going to search as I write this, but I'll be seeing if I can find a new hex tweak for Samus' bombs since there aren't a whole lot of those. I don't have a specific tweak in mind. Here we go... MAKING A TRACE .LOG FILE
PAY VERY CLOSE ATTENTION TO THIS STEP. How well you trace can mean the difference of the data you need coming up in a .log file or not. 1. Download Geiger's SNES Debugger from Geiger's homepage or from a download mirror I put here in case his site ever goes down. After the download is finished, extract everything from the .zip file to its own folder anywhere you want it to be on your hard drive. There should now be a folder called "Geiger" (or whatever you name the folder) somewhere on your computer with all of Geiger's files in it. 2. Make a copy of a clean, unheadered Super Metroid ROM that hasn't had any edits made to it and put it in the Geiger folder (if the ROM has already been hacked, then tracing might not be as accurate). If your ROM does have a header, Geiger will remove it for you when you open it, so don't worry. Give the ROM a filename something easy to spot like "HEX.SMC" (this is what I'll be naming mine). 3. Run HxD and open the HEX.SMC ROM you just copied with it. Now run SMILE and open the same HEX.SMC ROM in that program also. Lastly, run Lunar Address so you'll have it ready for later. In Lunar Address, make sure that "LoROM - PC 80:8000-FF:FFFF" is checked, and that the "Include $200 Copier Header" box is NOT checked. 4. Now, run Geiger's debugger (the filename is something like "Snes9X1.43.ep9r8.exe"). Once the emulator is open, click File > Open and pick HEX.SMC. Right when you open the ROM, a box will pop up with a bunch of buttons all over it. Click the button that says "Run" and the game will start. This window cannot be minimized, so get used to it being in the way (remember that this is a debugging tool, not just a regular emulator). 5. Play the game until you get bombs. Alternatively, you can use SMILE to put morph ball + bombs in the room with Samus' ship to save yourself some time. Either way, now that you've got bombs, it's time to make your first trace. Go somewhere in the game where there isn't a whole lot of activity (no enemies). You don't want code from unrelated things making it into your trace log. Since I never made it clear, 'tracing' is when the debugger logs all of the game's active and running code to a text file over a period of time that you decide. Traces can be about a second long and target really specific things, or they can be minutes or more and pick up a whole bunch of different code in one go. The code that Geiger picks up is actually just hex like we're used to, only it's formatted differently. More specifically, it's hex written out as assembly code instead of as a string of raw bytes. Now, to actually make a trace... 6. Enter morph ball form, then click anywhere on that Geiger window with all buttons on it to 'freeze' the game. There should be a bunch of check boxes in this window too. Make sure that these boxes are checked: Trace Once, Split, and Auto Usage Map. See the box that says "Log CPU"? That's what we'll be using to trace the ROM, so let's do a crash course: check Log CPU box. Now, click the "Run" button to unfreeze gameplay. The game is now tracing, so be fast if you can. What you wanna do now is, since you're already in morph ball form, drop a bunch of bombs for about 5-6 seconds, then click the Geiger window to freeze gameplay again. With that done, UNcheck the Log CPU box to turn off tracing. There's nothing specific you have to do while bombing unless you wanna look for a more specific edit, so don't worry yet if you "did it right." So, what did this get us? Go to the folder where all of your Geiger files are, then look for a file called HEX0000.log. See it? If you do, then congratulations, you made your first trace. But wait a second, THE FILE IS HUGE. This is normal. The first trace log made after loading a ROM seems to always be really large (400kb+), but they can still work. So now you have two options: start searching the log that you just made, or do another trace. I usually do another trace because the first one tends to pick up a bunch of unrelated data. I'm going trace bombs again exactly like I did before, by checking Log CPU, dropping bombs for several seconds, then unchecking Log CPU. My .log file ended up only being 10kb this time (HEX0001.log - any subsequent traces you make will be named HEX0002.log, HEX0003.log, etc.) This is a great improvement because there's a LOT less data than on my first file, and still a chance of the same bomb data from the first log also being in this one. If Geiger spits out a 0kb log file, just do another trace and bomb for a longer period of time, or do some other stuff between using bombs like rolling left and right. I think 0kb log files are a glitch with the program or something. However, loading a savestate seems to 'revive' the effect of getting huge trace logs if that helps you any. Since there's no guaranteeing that you and I will trace the same data, I'm gonna go ahead and put the .log file that I just made for download (get it here). I'm doing this for the sake of continuity, because if for whatever reason you can't make the same general trace I do, you wouldn't be able to progress through the rest of this docuement very easily. Okay, for real this time, let's open HEX0001.log and see what's in it. BLIND EDITS AND TESTING
... oh my. So there's a lot of stuff here that doesn't look like anything we've seen before. Don't panic, this is just normal hex being interpreted in a different way, and all of that jibberish past "A:" in the .log file can be ignored. Here's the first routine in the .log file, with everything past A: removed since we don't really need that data for what we're doing (honestly, I'm not really sure what everything past A: is for, so it could have a use in tweak hunting that I haven't realized, but for now I'm cutting it out because there's so much of it). I colored the values to make distinguishing them easier, and to help you figure out how ASM and hex are actually one in the same. $94/97BF AE C4 0D LDX $0DC4 [$94:0DC4] $94/97C2 BF 02 64 7F LDA $7F6402,x[$7F:8EDC] $94/97C6 1F 00 AND #$001F $94/97C9 05 00 #$0005 $94/97CC B0 01 BCS $01 [$97CF] $94/97CF 60 RTS This color = LoROM address This color = Hex bytes This color = ASM 'translation' of the same hex bytes Alright, there are a few different ways you can approach this. The way that you should go about it might depend on the kind of change you're trying to make, so listen up. Personally, I prefer to EA the whole routine and see what happens first, to make sure I'm even affecting the right area of data. Let me show you how to do that real quick. In the code above, we see that each line begins with a LoROM address (lines ALWAYS begin with a LoROM address, never PC or RAM). Convert the top one (9497BF) into a PC address using Lunar Address and go there in a hex editor (A17BF). The red bytes in the screenshot below are the same exact lines of code from the log file. Just look back and forth at the two until it makes sense if you need to. The data is the same. Notice that byte reversal does not apply when ASM code is involved. 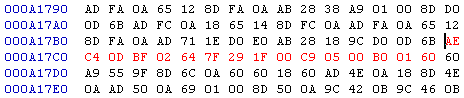 Oh look, a long edit. Remember these? Right-click on the bytes and copy them, then right-click on the bytes again and click on "Fill Selection..." Now type EA in the "Hex-values:" box and click "OK" to replace all of the bytes with EA. Save the ROM with your hex editor, then use SMILE to load the game and test it. Enter morph ball and start bombing. Do some bomb jumps. Do some diagonal bomb jumps. Charge your beam and enter morph ball to drop 5 bombs. Do whatever you can think of that involves using bombs and see if anything happens. Look for bombs (or Samus) acting differently when you use them. After that, do some other stuff to see if you changed something else besides bombs if you want to. Shoot beams, run and jump around, stuff like that. If the game freezes or crashes when you use bombs, then you might be onto something (crashing is when the screen goes black or fills up with glitchy graphics; might play random sounds or music too). A freeze or crash means that you could be close to where you need to be. However, if the game freezes/crashes the moment you load it before you have a chance to do anything, it could go either way - you might be right on top of what you're looking for, or you could have messed with unrelated code that runs constantly. After testing for a few minutes, I didn't notice any change at all with how bombs behaved, so what I'm gonna do now is go back to A17BF and paste the original code back where it was (in place of the EA bytes) and save my ROM again. This completely undoes the edit and will fix the ROM if that particular edit broke it. Now let's think a little, and maybe start taking notes. Deleting that routine didn't seem to do anything, so do we move on? Or do we try to analyze the code a bit more in case we overlooked something? It's possible to EA a whole routine without changing anything, but then if you change bytes within the original code after you've put it back where it was, stuff starts happening. With that in mind, let's probe this code a little more and see if it really is useless. See that "29 1F 00" and that "C9 05 00" there? These look exactly like variable hex tweaks, except I always take the first byte off before I post the info here (29 and C9) because they almost never need to be edited. Since hex bytes are read in reverse order, we're actually looking at 001F and 0005, or just 1F (31 in decimal) and 5. Values like these can go to some interesting hex tweaks, so I'm gonna change 1F 00 and 05 00 both to 01 00 and see if that does anything. Nope. Nothing. What now? Is this a piece of junk code that runs but does nothing? Finding completely useless data isn't a bad thing by the way; it could make efforts to clean the ROM easier for others in the future. If nothing unusual has happened by now, then it's safe to assume that there aren't any really good hex tweaks at this particular spot in the ROM. Go ahead and change those 01 00 bytes back to 1F 00 and 05 00 and save the ROM if you did that. Always be sure to undo whatever edits you make, even if they didn't seem to do anything. It's possible they DID do something that you didn't notice at the time, which could interfere with testing other potential hex tweaks later, or even worse, cause you to "discover" a new tweak that actually does nothing because an older tweak you didn't notice or bother to undo is still happening. Optional (but recommended): Open NotePad or some other text editor and make a quick note of what you searched (you should do this for every new place you search; you never know who else you might accidentally help out by doing it). This will keep you from accidentally searching the same place twice, or let you go back to it later and try again when you've gotten better. You don't have to keep a detailed catalogue or anything, just a quick reminder of what you did. Save the file as something like "HEX.TXT" so you can add more to it: A17BF-A17CE = Checked this data against bombs but saw no changes. This ends your crash course. Nothing found, lesson learned. Better luck next time, which is right now. KEJARDON'S RAM MAP
I held off mentioning the RAM map until now because I didn't want there to be too much information flying around in your head before you had a chance to try finding a tweak yourself. Kejardon's RAM map is one of the single most useful Super Metroid ROM hacking documents in existence if your intention is to understand the game on a much deeper level. Scyzer's Tank has a copy of the RAM map as well in the 'References' section that is a bit more up-to-date. What is RAM exactly? I don't know all the technical details, but basically, there are RAM addresses just like there are LoROM addresses and PC addresses, except RAM is universal to the SNES and more fundamental to making the game work. RAM addresses for Super Metroid will begin with either 7E or 7F (7E:#### or 7F:####). LoROM addresses can begin with 80 all the way up to FF (80:####-FF:####). PC addresses are converted LoROM addresses that are mostly just used for going to data in a hex editor (PC addresses will never show up in a trace). The 7E: and 7F: aren't usually defined in the code, so you only have the last 4 bytes (####) to go by a lot of the time. Not a problem though, because there are ways of telling if what you're looking at is a RAM address or not, and checking values against the RAM map only takes a few seconds anyway. Let's take another crack at finding something, but in a different way. Instead of dragging you through making another trace, I should go more into reading what's actually in a trace log. Like before, I don't have any particular new tweak in mind. I simply made a trace of Samus falling into some water, running and jumping around, then getting out of the water (download). This is a much less targeted trace than dropping bombs, so what we find here could be anything from how Samus behaves in water, how Samus behaves period, water splash graphics, water sounds and who knows what else. Watch extra close for stuff happening after you make edits, which we'll get to in a minute. Got the .log file? Good. Open it and look near the very top: $91/F713 AD A2 09 LDA $09A2 [$91:09A2] $91/F716 89 08 00 BIT #$0008 $91/F719 D0 29 BNE $29 [$F744] $91/F71B 89 00 02 BIT #$0200 $91/F71E D0 15 BNE $15 [$F735] $91/F720 AD 9A 0A LDA $0A9A [$91:0A9A] $91/F723 F0 02 BEQ $02 [$F727] $91/F727 AD 51 1F LDA $1F51 [$91:1F51] $91/F72A D0 F9 BNE $F9 [$F725] $91/F72C A9 31 00 LDA #$0031 $91/F72F 22 49 90 80 JSL $809049[$80:9049] Before I continue: you know the difference between an address and a value, right? If you don't, an address is where data is, simple as that. 'Value' can have slightly different meanings (kinda like the difference between animation frames and hardware frames). Each individual hex byte could be considered a value, but I'm gonna stick with calling them bytes to avoid confusion. More commonly, value refers to an amount. The amount can be anything from a number (damage and stuff), or the length, size and speed of something, etc. Why did I feel the need to explain values? Because RAM addresses, LoROM addresses and values are all referenced only using 2 bytes a lot. Not always, but a lot. And because value tweaks are the most common, and usually end up being the best. Here's how to tell RAM, ROM and values apart if they're being used as a 3-byte instruction (## ## ##): RAM addresses Begins with only a $. Can't be higher than 7FFF (or it gets handled as a LoROM address) unless you add 7E or 7F and make it a 4-byte instruction. LoROM addresses Begins with only a $. Can't be lower than 8000 (or it gets handled as a RAM address). Values Begins with #$ - remember that. Any time the pound and dollar sign are next to each other following a 4-digit number, that's a value of some sort. Can look like #$0001 or #$0031 or anything else. With that in mind, and looking up at $09A2 and #$0008 - notice that 0008 has a # in front of it but 09A2 does not. 09A2 is obviously lower than 7FFF, so we can be pretty sure that it's a RAM address. 0008 is a value, no doubt. Now what? Since we can mostly tell RAM addresses apart, we can see if that same address has been documented in the RAM map yet. If it has (and most likely, it has), you'll have a better idea what sort of code you're looking at. So, what does Kejardon's RAM map say about 09A2...? 7E:09A2 - 7E:09A3 Equipped items Ooooh, so maybe this means the value after it (0008) denotes an item (see item values near the bottom later if you need to). Since landing in water was one of the first things that happened in my second trace, this code could be involved with checking for certain items to switch off without gravity suit equipped. Who knows! Let's nuke everything first and see what happens (copy/replace 8F713-8F732 with EA). After doing that, are you seeing what I'm seeing happen to Samus? Screw attack and space jump aren't loading normally if you jump to the left. Cool. From this, we can generally deduce that this code (at least, in part) handles switching to different graphics and playing a different sound when space jump/screw attack are used. 8F713-8F732 = Something for space jump/screw attack graphics/sound, facing left. Write that down if you're so inclined, but definitely put the data at 8F713-8F732 back where it was before you continue. Is that all this routine does? Is there an equivalent routine for facing the other way? What about after walljumping? Consider everything, and know that even just having the address written and a vague idea of what's there could help someone else locate data or a hijack point later. I could walk you through picking apart the rest of this code, but you'll know enough to do that later anyway. Let's look at a different chunk: $91/F673 9C 44 0B STZ $0B44 [$91:0B44] $91/F676 9C 42 0B STZ $0B42 [$91:0B42] $91/F679 A9 01 00 LDA #$0001 $91/F67C 8D 4A 0B STA $0B4A [$91:0B4A] $91/F68A AD A2 09 LDA $09A2 [$91:09A2] $91/F68D 89 20 00 BIT #$0020 $91/F690 D0 20 BNE $20 [$F6B2] $91/F692 22 58 EC 90 JSL $90EC58[$90:EC58] Right away we see 4 different RAM addresses here, so what are they? Look over at the RAM map again at these: 7E:09A2 - 7E:09A3 Equipped items 7E:0B42 - 7E:0B43 Samus's horizontal speed forward. (pixels/frame) 7E:0B44 - 7E:0B45 Samus's horizontal speed forward (1/65536ths pixel/frame) 7E:0B4A - 7E:0B4B Something to do with momentum and speed. Cause of mockball. (0 = increasing momentum, !0(always 1?) = decreasing momentum) Interesting, so we've got two RAM addresses dealing with Samus' movement speed, then a value right after them. Change the value here from 01 00 (#$0001) to 00 00 and see what happens. Oh, sweet. Looks like this value has a hand in Samus' spinning jump speed while underwater without gravity suit. 01 00 to 00 00 eliminated the 'rubber band' effect of doing a spinjump underwater and then trying to turn the other way. You can now go left and right quickly with no loss (or gain) of momentum. This change alone could make underwater physics friendlier for your hack without seeming too obvious. When I tried other values besides 00 00, the effect seemed to be the same, or Samus wasn't able to turn at all. Test however long you want, write down whatever you find and go on to something else. 8F67A - 01 00 to 00 00 = Easy spinjump turning in water without gravity suit. 8F68E - 20 00 = Gravity suit check for loading screw attack/space jump underwater, facing right? As a last note about the RAM map, sometimes you'll see the same address at more than one spot in the code. This is normal, since some RAM addresses are made to be multi-purpose. Samus' momentum and speed are an example. You'll most likely see $09A2 and $09A4 in plenty of other spots besides where we just looked. Don't be afraid to try a different RAM address in place of one that's already there if you think something interesting might happen. CHASING DATA
Sometimes you'll find a piece of data that jumps to what you're actually looking for, but wasn't picked up directly by the trace. Doesn't happen all the time, but enough to get its own section here. So what exactly does a jump or a branch look like? There are two main ways to spot them. You can look at the ASM for the opcode name, or you can look at the raw hex for the appropriate byte (which is harder to do until you learn to read assembly as hex or vice-versa). I won't be looking for a hex tweak in this section since we've already done that a few times, and it would make the overall point clouded. Instead, I'm just gonna grab a piece of code and explain a few things for you: $90/95E7 AE 41 09 LDX $0941 [$90:0941] $90/95EA AD F6 0A LDA $0AF6 [$90:0AF6] $90/95ED 38 SEC $90/95EE FD 3F 96 SBC $963F,x[$90:963F] $90/95F1 8D 0A 0B STA $0B0A [$90:0B0A] $90/95F4 80 0D BRA $0D [$9603] $90/960D AD 0F 09 LDA $090F [$90:090F] $90/9610 18 CLC $90/9611 6D A4 0D ADC $0DA4 [$90:0DA4] $90/9614 8D 0F 09 STA $090F [$90:090F] $90/9617 AD 11 09 LDA $0911 [$90:0911] $90/961A 6D A2 0D ADC $0DA2 [$90:0DA2] $90/961D 8D 11 09 STA $0911 [$90:0911] $90/9620 22 41 A6 80 JSL $80A641[$80:A641] I didn't bother coloring everything since we only need to look at two parts this time, which are a branch and a jump to other code. Hopefully after I'm done explaining this you'll know enough to bend them around and make some cool stuff happen. Here goes: BRANCHES Are always read as 2-byte instructions (## ##). The first byte is the type of branch to use, and the second byte is how many bytes ahead that the code is located. So for the 80 0D, 80 = Branch Always, and 0D = 12 bytes. 80 0D basically means "Jump 12 bytes ahead and run that code." The rule of the second byte being how many bytes to jump ahead stays the same for all branch types. The other types of branch are as follows: 10 = BPL (Branch if Plus) 30 = BMI (Branch of Minus) 80 = BRA (Branch Always) 90 = BCC (Branch if Carry Clear) B0 = BCS (Branch if Carry Set) D0 = BNE (Branch if Not Equal) F0 = BEQ (Branch if Equal) Now, if you're poking around in raw hex and you see 10, 30, 80, 90, B0, D0 or F0 and a ## right after it, you might be looking at a branch. It can be hard to tell if it's a branch or not if you can't actually read assembly, but that's okay. If see, for example, a D0 0D next to some code you're tinkering with, change the D0 into another branch, like F0 or 80 and see if that does anything. I've found a good number of nice hex tweaks by switching up the branches like this. ... or you could do like the branch intended and see what kind of code it's trying to run. Sticking with the example chunk of code above, I'm looking at the 80 0D at PC address 815F4. For counting the number of bytes, in this case 0D (or 12 in decimal), you wanna begin counting AFTER the specified number, which would be immediately after 0D. An easy way of counting is to just select bytes while paying attention to HxD's "Length:" at the bottom of the window, next to where "Block:" is for telling you the beginning and end point of your selection. When Length: says "D" it means your selection is 0D (12) bytes long, which also means the code being branched to starts here, beginning with AD 0A 0B and so on. If you think you understand it well enough, you could try adjusting the second byte to jump to another area of code to run, but you'll most likely just crash the game unless you know what you're doing or get really lucky. JUMPS These work sort of the same way branches do, except jumps will specify an address (which is read in reverse-byte order) instead of a value. And unlike branches, which are always 2, jumps can use 3 and 4-byte instructions. There are lots of different jump types, but I'm only gonna focus on JSR and JSL because the other types aren't used nearly as often. 20 = JSR (Jump to Subroutine): 3-byte instruction, seen as 20 ## ##. The ## ## are the last 4 digits of a LoROM address for more data within the same bank only. So if you're in bank 91, all JSRs in bank 91 can only go to more stuff in bank 91. To jump to another bank, you'd need to use JSL. A loose example would be 20 A9 81 (JSR $81A9). This would jump to $##/81A9, with ## being whatever bank the JSR is in. To deal with JSRs, you can NOP the whole instruction (EA EA EA), or try jumping to another portion of code if you're awesome enough. 22 = JSL (Jump to Subroutine Long): 4-byte instruction, seen as 22 ## ## ##. "Long" means it can jump from and to any bank in the ROM. Looking up at the example chunk of code, we see 22 41 A6 80, and right next to it, JSL $80A641. In this case, LoROM address 80A641 is being read backwards as 31 A6 80 instead because it's in raw hex. The only real difference between JSL and JSR is 22 instead of 20, and an extra byte so you can specify all 6 digits of an address and jump to any bank, instead of being limited to 4 digits within a single bank. You can deal with these by NOPing the whole instruction (EA EA EA EA) or, again, use them to jump to another portion of code if you're awesome enough. "Jump switching" can give results as disasterous or awesome as any other hex tweak. It can be used on any 2 JSRs or JSLs. An example would be, say you've got 22 11 11 11, and nearby you can also see a 22 10 10 10. Just put 10 10 10 where the 11 11 11 was, then 11 11 11 where the 10 10 10 was so the two jumps have effectively been switched out. You don't have to actually switch them, you could even decide to just change 22 11 11 11 to 22 10 10 10 without modifying the other 22 10 10 10 that was already there. Get it? With all that in mind, we can see that even though all of this code is from bank $90, the JSL at the bottom is telling us that there's also some active code at LoROM address 80A641, which is actually PC address 2641. This is very 'early' in the ROM's data, almost at the very top, so I'm going to assume that this is very important code that we shouldn't be messing with and leave it alone. In my experience, messing around with this kind of high-level code hasn't given me many cool results, but feel free to "chase" it down yourself and see what's there anyway if you want. DATA NEAR DATA
What you're looking for could be right next to something that somebody else has already found. It's not likely, but at the very least you might find something that was overlooked nearby. It's true that a lot of relevant data can be kinda scattered around, but not everything is. You'd be surprised what could be unearthed by changing something 5 bytes away from an already documented tweak, although being that close is probably very rare. An average estimate would be about 200 bytes before and after a known tweak that somebody else has found before you might be straying into unrelated code, but it could be more or less than that depending on the kind of code exactly. It goes without saying that you've also got tracing and a RAM map at your disposal while doing this, but if you wanna save some time, you can get by with only using a hex editor to make fast edits, test, then undo. More than anything, it helps to know what kind of bytes to replace that will generally have results, which I talked about in the section above. For fun, I'm gonna see if anything new with beam charging can be found (not looking for anything in particular). I'll start by using the tweak for how long you must be charging before a charged shot can be fired, which is 83860 - 3C. Changing 3C (which is one second) to 01 will let you fire charged shots almost instantly which is cool and all, but is there anything else we can find here? Go to 83860 with a hex editor and have a look around. I colored and marked stuff to try and help you "see what I see" or something, but I don't know how well I did at clearing anything up because there's a lot of stuff here. Any of these bytes could do anything or nothing at all to how charging beams will act. 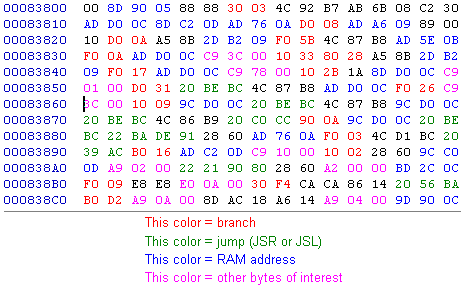 With so many options, generally the first thing I do is check if the values do anything (marked with pink in that picture). We already know what the 3C 00 at 83860 is for, but I see another 3C 00 (which I couldn't find a use for, but I'm sure it has one somewhere), along with a 78 00, 10 00, 02 00 and a couple others. If you wanna make a sweeping edit, go through all of these values and change the 00 to 01 so you've got 78 01, 10 01, etc. Save and test; look for anything that 'freezes' for a few seconds before resuming, or moves abnormally fast or slow. Or you could be a bit more conservative and see what RAM addresses are being used before you do anything else. At a glance I can see 0CD0, 0B5E, 0A76, 0DC2 and some others. From memory, I already know 0CD0 is related to Samus charging beams, so you might get results if you change any instance of ## D0 0C into EA EA EA, although the results you get will likely have no real use in any hack. Not much more I can explain here without overkilling it. Sometimes all you need is a place to start. This is one way to get one. BREAKPOINTING
You most likely won't need to use these unless you're seriously hacking something, but at the same time they have just enough functionality to be used if you want them for what you're doing. A "breakpoint" pauses the game and notifies you of specific RAM or LoROM addresses being read, written to or executed by the game. I haven't used breakpoints much, so I can't go very deep into what kind of data will break and what kind of data won't. I'm sure there are settings within the emulator for breakpoints that I haven't even touched yet, but I should be able to show you how to at least use them in a very basic sense. The exact purpose of breakpoints is to let you know if a specific LoROM or RAM address is getting a certain kind of activity. In other words, "Is this code here actually running?" So let's grab a LoROM address and test it out. I'll use the charge beam tweak from earlier as an example: 1. Convert 83860 from a PC address to a LoROM address (90B860). 2. In Geiger's debugger, click the "Breakpoints" button to make a little window with 5 boxes and 15 check boxes appear. 3. Enter 90B860 in one of the boxes, then check the box next to it that says "Exec." Now click "OK" to close the breakpoint window, then click "Run" to unfreeze the game. 4. Charge and fire a beam. The game should freeze again the moment you release the shoot button, and display some text at the bottom of the window that says: $90/B85F C9 3C 00 CMP #$003C A:0060 X:0000 Y:0047 D:0000 DB:90 S:1FED P:envmxdizcHC:1172 VC:043 00 FL:61217 5. Breakpoint complete. As you can see, it picked up the 3C 00 and verified that it was running just fine. If you change the 3C to something like 01 with a hex editor, then save, then re-load the ROM with Geiger and breakpoint that spot again, the breakpoint text will reflect your changes by telling you $90/B85F C9 01 00 CMP #$0001 and so on. Breakpointing RAM addresses works the same way. Be sure to try out all 3 of the different check boxes if you don't seem to be getting a break when you want one to happen. A little more about those check boxes, from what I could gather: Exec Means "Execute" as you can guess, though honestly I don't know how it differs from the "read" option. Read For data that gets, well... read. I guess this one usually applies to values like the charge beam delay above. Write For data that gets written or re-written. I assume this is for things like energy or missiles changing to a new number. OBVIOUS EDITS
Sometimes you just might see something happen that nobody has found a tweak for yet. It occurred to me earlier that timers for the blocks that Samus destroys haven't been added to the main site. I think somebody else has found them before, but since the info isn't readily available to me at this very moment, they'll make for a good example. What do the blocks do exactly? On a frame-by-frame basis, that is. There could be several different value types that go into it, dictating things like how fast the blocks disappear, how long they stay gone, how quickly they reappear, etc. I'm gonna guess that each different type of destructible block has its own set of timers. I hope they do. Crumble blocks, shot blocks, bomb blocks, etc. Which one to start with? All up to you. I'm gonna see what's up with crumble blocks. Right off the bat, we know by now that all of these will most likely be frame values. Respawning bomb/shot/speed booster/etc. blocks will stay gone for a few seconds before they come back. And since #$003C (3C 00) is exactly 1 second (counting in hex), you should know to look for a value in the range of about F0 00 to about ## 01. Let's do this thing. Looking near something found by somebody else could work. Just so happens there's a few block-specific documents, also by Kejardon that can be found on his page. The easiest way to get the ball rolling that I can think of is doing a trace. Crumble blocks should be very easy to get an accurate trace for. All I need to do is stand partially on one so it disappears and reappears in an endless loop, then trace a couple seconds of that:  Right on. So what did we end up with? Grab my trace here if you want it. Crumble blocks take longer to vanish and come back than they do to stay gone. Actually, they start reappearing almost instantly. 0001-000A sounds like a good value range. Already I see a 0003 near the top of this trace, but I wanna see what the RAM map is telling me first, since there's a lot of other stuff in this file. At a glance, I see stuff related to enemies. Using Ctrl+F and searching for related words is a good idea. There could be many results, so look through each one for something that sounds like a good lead. Here's what I got by Ctrl+F searching the word "block": 7E:0DD0 - 7E:0DD1 0000 = Samus did not collide with anything. 0001 = Collision with block. FFFF = Collision with enemy? 7E:1E67 - 7E:1E68 Used as draw instruction to custom-draw PLM blocks. Usually #$0001 (1 block) 7E:1E69 - 7E:1E6A Used as draw instruction to custom-draw PLM blocks. Custom block value 7E:1E6B - 7E:1E6C Used as draw instruction to custom-draw PLM blocks. Usually #$0000, end value. Not very promising, but just 'cuz, I'm gonna breakpoint one of these and show you a little something else that might help you, or it might waste your time. Enter "1E67" into the breakpoint box, then check "Read." Now click "OK" and "Run." You should notice that Geiger will freeze gameplay and show you a new line of text at the bottom if Samus is touching a certain type of block. Crumble blocks, or being inside of a respawning bomb/shot block to be precise, though I'm sure a lot of other block types will also work, excluding the most common ones like solid and air blocks. When a breakpoint freezes the game to let you know something, you're given some options. Next Op, Step Into, Step Over, Step Out, Skip I don't fully understand them yet myself, but there are buttons that let you step amidst the game's instructions, one at a time. Those 5 buttons are: Next Op, Step Into, Step Over, Step Out, Skip. RAM address 7E:1E67 likes to breakpoint whenever the crumble block reforms underneath Samus' foot after disappearing (see the screenshot above). When these breakpoints happen, try those 5 buttons out and see what gives if you want to, but just remember that they're there regardless. After following Step Into for a short while, I found a JSL that seems to affect (or be affected by) blocks being destroyed and respawning. It breakpoints 4 times as the blocks disappear, and another 4 as they reappear. Might break under other conditions that I haven't seen yet. Either way, the JSL in question is at 20616 (PC). There you'll see 22 90 82 84, which is JSL $848290 (LoROM), or just 20290 (PC). Let's see what's over here. From what I can tell, the data here going from 20290-202B3 looks like it handles drawing the new graphics for BTS and PLM, which are related. Interesting stuff, but not what I'm looking for. Some of the data after this looks like it goes to the missile item PLM. So, looks like another dead end. What now? Since the data that the JSL lead to wasn't what we needed, I'm gonna go back to where the JSL itself is, at 20616. Maybe something around here will give me some love. I do see a JSR immediately after that JSL. See for yourself: 22 90 82 84 20 AA 8D. 20 AA 8D = JSR $8DAA. Since we're in bank 84 right now, this means there's data at 848DAA (LoROM), which is 20DAA (PC). The routine here (20DAA-20DD6) also seems to affect how the game draws new graphics for BTS and PLM blocks. Dead end like before. I don't think I'll get much farther by poking around with hex like this. I'm going to do another trace, this time of Samus bombing a block and waiting for it to respawn. I noticed that some of the data I've been playing around with affected bomb blocks too, so maybe by searching those out instead I'll find crumble blocks that way. Will write more for this portion later. STUFF TO WATCH FOR & REFERENCES
Item BITs. Generally, the Xs will all be 0, meaning 01 00 would be the Varia suit. Look for these values near any RAM addresses that deal with Samus' equipment (most likely 7E:09A2 or 7E:09A4), usually preceeded by A9, C9, 69, etc. Values can be added together, meaning 03 00 would be Varia+Spring Ball (02 00 + 01 00). Beam BITs are more or less the same, only they're associated with different RAM addresses (7E:09A6, 7E:09A8). xxx1 = Varia xxx2 = Spring Ball xxx4 = Morph Ball xxx8 = Screw Attack xx1x = None xx2x = Gravity xx4x = None xx8x = None x1xx = Hi-Jump x2xx = Space Jump x4xx = None x8xx = None 1xxx = Bomb 2xxx = Speed Booster 4xxx = Grapple Beam 8xxx = X-Ray Scope 0001 = Wave 0002 = Ice 0004 = Spazer 0008 = Plasma 0010 = Charged beam 0020 = Unused 0040 = Unused 0080 = Unused 0100 = Missile / PB / Deadbeam 0200 = Super Missile / PB / Deadbeam 0400 = Dead Beam 0800 = Dead Missile/Super 1000 = Charge 2000 = Unused 4000 = Unused 8000 = Live beam 0500 = Bomb +0700 = Dead beam +0300 = Powerbomb 0020, 0040, 0080, 2000, 4000 = unused Common bytes associated with straightforward hex edits: A9, C9, 69, 29, D0, F0, 80, ## 00, 22, 20 |